Table of Contents
Quick Summary Box
- The routine: 15 to 20 minutes total, 5 targeted shoulder exercises, 2 to 3 days per week
- Top beginner gear: A Heavy-Duty Handle Resistance Band Set with Door Anchor covers every movement in this routine from one piece of equipment
- The goal: Build strong, well-rounded shoulders while training the rotator cuff safely alongside your main deltoid work
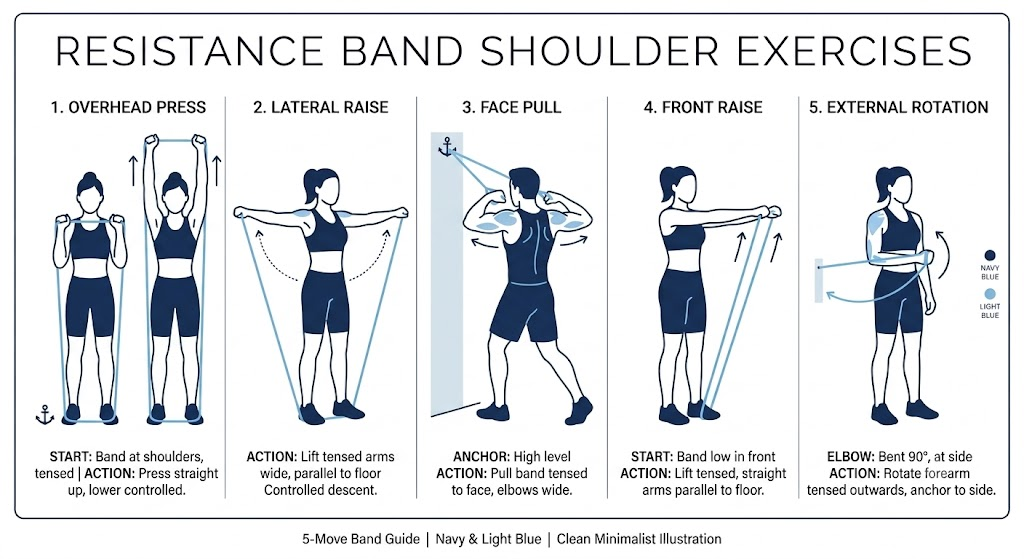
A resistance band shoulder workout at home trains your anterior, lateral, and rear deltoids through five targeted movements — overhead presses, lateral raises, face pulls, front raises, and rotator cuff external rotations — done in 15 to 20 minutes, 2 to 3 times per week. Unlike a dumbbell, a band’s resistance increases as it stretches rather than staying constant against gravity, which loads your shoulder joint more gently at vulnerable end-range positions while still building genuine strength.
Why Resistance Bands Are Ideal for Home Shoulder Training
A dumbbell’s resistance comes entirely from gravity — the weight pulls straight down regardless of where your arm is in the movement. A band works differently: tension builds progressively as it stretches, meaning resistance is lightest at the start of a movement and increases as you move through the range, rather than staying fixed throughout.
This matters enormously for shoulder training specifically. The positions where your rotator cuff and shoulder joint are most vulnerable — full overhead extension, end-range external rotation — are exactly where a band’s resistance curve is naturally gentlest relative to a dumbbell’s constant load, reducing dynamic joint impingement risk while still delivering an effective training stimulus.
According to Healthline, resistance bands keep muscles constantly under tension throughout a movement, including during the eccentric or lengthening phase — something free weights don’t consistently achieve, since gravity briefly removes tension at certain points in most dumbbell exercises.
Selecting the Right Bands for Shoulder Isolation

| Band Type | Anchor Stability | Progressive Resistance | Best For |
|---|---|---|---|
| Tube Bands with Handles | Excellent with door anchor | High — multiple resistance levels | Presses, face pulls, rows |
| Flat Loop Bands | Good for standing exercises | Moderate — fixed per band | Lateral raises, front raises |
| Flat Physical Therapy Bands | Minimal anchor needed | Light, precise increments | Rotator cuff isolation work |
For most beginners, a Heavy-Duty Handle Resistance Band Set with Door Anchor covers the widest range of movements in this routine, from overhead presses to anchored face pulls.
For standing exercises that don’t need a door anchor at all, a Flat Elastic Resistance Loop Bands Set gives you a simple, portable option for lateral and front raises.
For the precise, light resistance rotator cuff work genuinely benefits from, a TheraBand Latex-Free Exercise Band Set offers the fine-grained resistance increments that dedicated shoulder isolation work calls for.
The Beginner Home Shoulder Workout

| Movement | Sets x Reps |
|---|---|
| Overhead Band Shoulder Press | 3 x 10-12 reps |
| Standing Lateral Raises | 3 x 12-15 reps |
| Band Face Pulls with Door Anchor | 3 x 15 reps |
| Banded Front Raises | 3 x 10-12 reps |
| Rotator Cuff External Rotations | 2-3 x 15 reps per side |
1. Overhead Band Shoulder Press
Stand on the band with feet shoulder-width apart, holding a handle in each hand at shoulder height. Press both hands overhead until your arms are extended, then lower with control back to the starting position.
2. Standing Resistance Band Lateral Raises
Stand on the band with one handle in each hand at your sides. Raise both arms out to shoulder height, keeping a slight bend in your elbows, then lower with control.
3. Band Face Pulls with Door Anchor
Anchor the band at chest height on a door. Pull both handles toward your face, elbows flaring wide, squeezing your shoulder blades together at the peak of the movement.
4. Banded Front Raises
Stand on the band with one handle in each hand in front of your thighs. Raise both arms forward to shoulder height, keeping them straight but not locked, then lower with control.
5. Standing Rotator Cuff External Rotations
Anchor the band at elbow height. With your elbow bent at 90 degrees and tucked against your side, rotate your forearm outward against the band’s resistance, then return with control. This movement should feel light — it’s isolation work, not a strength builder.
Rotator Cuff Safety and Impingement Prevention
Keep your shoulders depressed, away from your ears, throughout every movement. Shrugging during overhead presses or lateral raises shifts load onto your traps and away from your deltoids, while also placing your shoulder joint in a less stable position.
Avoid over-arching your lower back during overhead presses. If you feel your lower back arching to help push the band overhead, that’s a sign the resistance is too heavy or your core isn’t sufficiently braced — reduce the tension and reset your form.
Control the eccentric (lowering) phase of every rep. Letting the band snap back quickly removes the training benefit and increases strain on the joint. Lower with the same control you used to lift.
For a deeper understanding of your shoulder anatomy and injury risk, Mayo Clinic Health System explains that the rotator cuff holds the ball and socket of the shoulder joint in place, and that injuries commonly result from repetitive overhead strain or acute trauma — reinforcing why controlled, joint-friendly training matters for long-term shoulder health.
How to Progress Resistance Without Heavy Weights
Once this routine starts feeling manageable, three tools keep it challenging without buying an entirely new, heavier band set.
Changing your stance width relative to the anchor point increases or decreases the starting tension on the band, letting you fine-tune difficulty without swapping equipment.
Adjusting your band choke point — wrapping the band around your hand to shorten its effective length — increases resistance instantly and is one of the simplest progression tools available.
Stacking multiple bands together for a single movement combines their resistance levels, giving you a genuinely heavier load once single bands feel too light.
If your shoulders feel fatigued or sore after ramping up this routine, our guide on working out with sore muscles covers exactly how to tell the difference between normal training soreness and something that needs more caution.
Frequently Asked Questions
Can you build shoulder muscle with just resistance bands?
Yes. Bands provide genuine progressive resistance capable of stimulating muscle growth, particularly when combined with controlled tempo and sufficient training volume. Research on elastic resistance training has found strength gains comparable to conventional weight training across multiple studies.
How often should beginners do a resistance band shoulder workout?
Two to three sessions per week with rest days between allows your shoulders adequate recovery time while still building strength consistently. Training the same shoulder muscles daily without rest increases the risk of overuse strain.
Are resistance bands safer for rotator cuff injuries than dumbbells?
For general shoulder training and prehab work, bands are widely considered gentler on the joint than dumbbells, since their resistance curve loads less heavily at vulnerable end-range positions where dumbbells apply constant load regardless of joint angle. However, this is different from treating an actual diagnosed rotator cuff injury or tear — if you’re experiencing shoulder pain, weakness, or reduced range of motion, see a doctor or physical therapist before starting any new exercise programme, rather than relying on this routine as treatment.
How do I attach resistance bands to a door safely?
Feed the anchor’s padded stopper through the gap on the hinge side of the door, close the door completely, and lock it if possible. Always pull-test the anchor with a firm tug before starting your set, and check your door hinges are solid before every session.
Disclaimer & Affiliate Disclosure
This article is for informational purposes only and should not be taken as medical advice. Always consult with a qualified healthcare provider or certified fitness professional before starting or changing your exercise routine. This article may also contain affiliate links. If you purchase through these links, we may earn a small commission at no extra cost to you.